Did you know you should drain and clean your traditional water heater every year? If you don’t, you could be drinking milky water.
What’s milky water? Well, it definitely doesn’t come from a cow. Milky water is water with hard water minerals, other sediments, and rust. Gross right?
At Monkey Wrench Plumbing, we know how to maintain all types of water heaters, and we service them all over the LA area. We want to give you that hard-earned knowledge so you can take charge of your home’s plumbing.
By the end of this article, you will learn why traditional water heaters need to be drained, when they need to be drained, what equipment you need, and how to do it.

Why You Need to Drain A Traditional Water Heater
Traditional water heaters need maintenance because of drumroll, please…hard water. Hard water is water with large amounts of dissolved calcium and magnesium in it. This hard water creates a scale that does the following to your water heater:
- It eats through and rusts the metal
- Reduces its efficiency
To stop all of that from happening, you or a plumber can drain your traditional water heater. But, how do you know if you have hard water? Well, if you live in the US, you have naturally occurring hard water. But don’t just take our word for it. You can easily test your water with a water hardness test.
Map of the hard water across the US

How To Tell If You Need to Drain Your Water Heater
There are some tell-tale signs that you should drain your water heater, and they are:
- Lukewarm water – Sediment takes up space that your water should use, so you’ll get lukewarm water faster.
- Popcorn sounds – If you hear popping sounds coming from your water heater, that’s the sediment popping from being heated up! These sounds can be so loud you can hear them from across the house.
- Cloudy water – If your water is coming out cloudy, it has a lot of sediment in it.
- Scale on your fixtures – Minerals in sediment can build up and block your fixtures.
So if you’re dealing with these problems or it’s been a year since you last did maintenance on your water heater, it’s probably time to drain it.
A showerhead with this much scale on it is a sign you should drain and flush your water heater.

What You Need to Drain Your Water Heater
If you’re ready to drain your water heater, make sure you have 2-3 hours to devote to it. Traditional water heaters can be tough to clean because the process can be very manual. Once you’re ready to drain your water heater, you’ll need to get a few things depending on the size of your water heater.
Depending on how big your water heater is, you’ll need different materials.
If you have a water heater that’s 30-75 gal, you’ll need:
- Bucket – To catch the water
- Hose – To drain the water
- Channel locks – To loosen the bolts on your water heater
- Screwdriver – To loosen the durian valve
Use channel locks like these to help loosen stubborn bolts.

If you have an 80-100 gal water heater, you’ll need the above and:
- Scraper – To dislodge scale buildup
- Shop-vac – To remove scale buildup and leftover water
If you have these things and are ready to start cleaning your water heater, proceed to the next section!
The 6 Steps to Drain a Water Heater
In this next section, we’ll go over the six steps of draining your water heater. The steps are:
1. Turn Off Your Water Heater
2. Turn Off Your Water
3. Hook Up Your Hose
4. Drain Your Water Heater
5. Cleaning Your Water Heater
6. Turn Everything Back On
1. Turn Off Your Water Heater
Depending on what type of water heater you have (gas or electric), you’ll have to turn your water heater off differently.
Turning Off a Gas Water Heater
To turn off a gas water heater, look for the pilot light knob. Turn this off. This keeps the water heater from kicking on when you’re working on it.
Turning Off an Electric Water Heater
If you have an electric water heater, locate your house’s circuit breaker. Find the breaker that leads to your water heater and shut that off.
Turn off your electric water heater from your circuit breaker.

2. Turn Off Your Water
Next, locate your cold water inlet valve; this is a valve attached to your cold water line. To shut it off, make sure you turn the knob, so it’s parallel to the ground. This step makes sure you don’t waste any water while you’re cleaning your tank.
Then let your tank cool down before moving on to the next step. Most water heaters are set to 120-140 degrees (the Environmental Protection Agency recommends 120 degrees while the Occupational Safety and Health Administration recommends 140 degrees). These temperatures can cause third-degree burns, so be careful.
3. Hook Up Your Hose
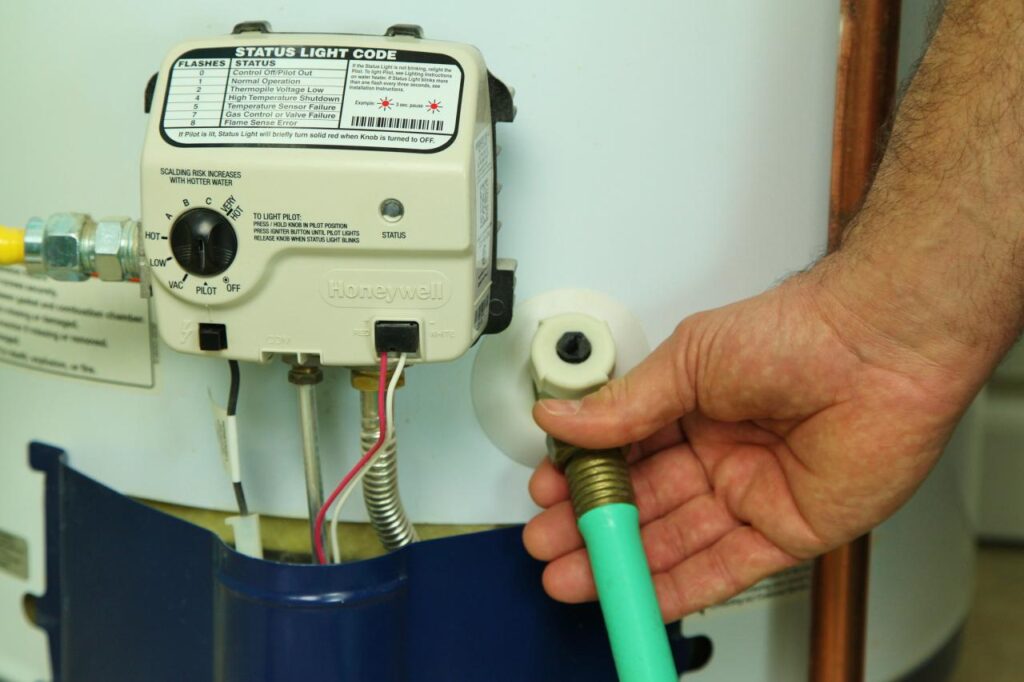
Locate your drain valve. This should be near the bottom of your water heater. Screw your hose into this valve and put the other end into the bucket so you can drain your water heater. Use your channel locks to make sure the hose is secured. Then use your screwdriver to open the drain valve.
As you can see, the drain valve doesn’t have a knob, so you need to use a screwdriver.

4. Drain Your Water Heater
Now it’s time to get down to business. To drain your water heater, you’ll need to get some air into it through one of two ways.
Pressure Relief Valve (Regulator)
This valve will be on the side of your water heater. Lift the valve, and air will flow into the water heater. You’ll know if this works because you hear some bubbling or coffee brewing sounds.
Water Flex
If your pressure relief valve didn’t work or you don’t have one, you can use your channel locks to loosen a water flex on top of your water heater. These are the flexible pipes.
Once you get air into your water heater, it will begin to drain. It could take up to an hour to drain completely.
A pressure relief valve and waterlines
.jpg)
5. Cleaning Your Water Heater
Once your water heater is entirely empty, you’ll want to clean it. The process of cleaning the inside of your water heater is different depending on the size we talked about earlier.
Cleaning a Small Water Heater
If you loosened a water flex, you’ll want to tighten it. Then you’ll want to turn your cold inlet valve on again. This process will flush the water heater and stir up any leftover sediment.
Let your water run for five minutes.
Cleaning a Large Water Heater
If you have a large water heater, you can clean it more thoroughly because they have what’s called an access plate. This plate gives you access to the inside of your water heater. Remove the plate, and you can use the scraper and shop vac to get the scale buildup out. The buildup will look like cottage cheese.
Once it’s all cleaned out, reseal the access plate.
6. Turn Everything Back On
Now that everything is clean, you can return everything to its original position. Then run a fixture in your house for about five minutes to get rid of any air still trapped in your water heater.
Next Steps After Flushing Your Water Heater
Now that you know the why, when, and how to drain your water heater, you may be wondering what you can do to protect it and you in the future. Once you notice that milky water, you can’t unsee it.
Water filtration is a key player in stopping the fight against hard water. Read a bit more on your options in these easy guides.
- Water Softeners: A Crash Course
- Water Filtration: Water Softener vs. Flow-Tech
- Flow-Tech: What It Is and How it Saves You Cash
If you want help maintaining your water heater and you’re in our Los Angeles service area, call us at+19169176280

